Academy
How to Make a Cross Stitch Pattern: By Hand or Photo
By Threadhood Content Team · · 7 min read
You want to stitch your own picture, but every pattern online is somebody else's. Here is how to make a cross stitch pattern yourself. Graph paper and a pencil work, but they get slow fast. A converter is quicker and gives you a thread list too.
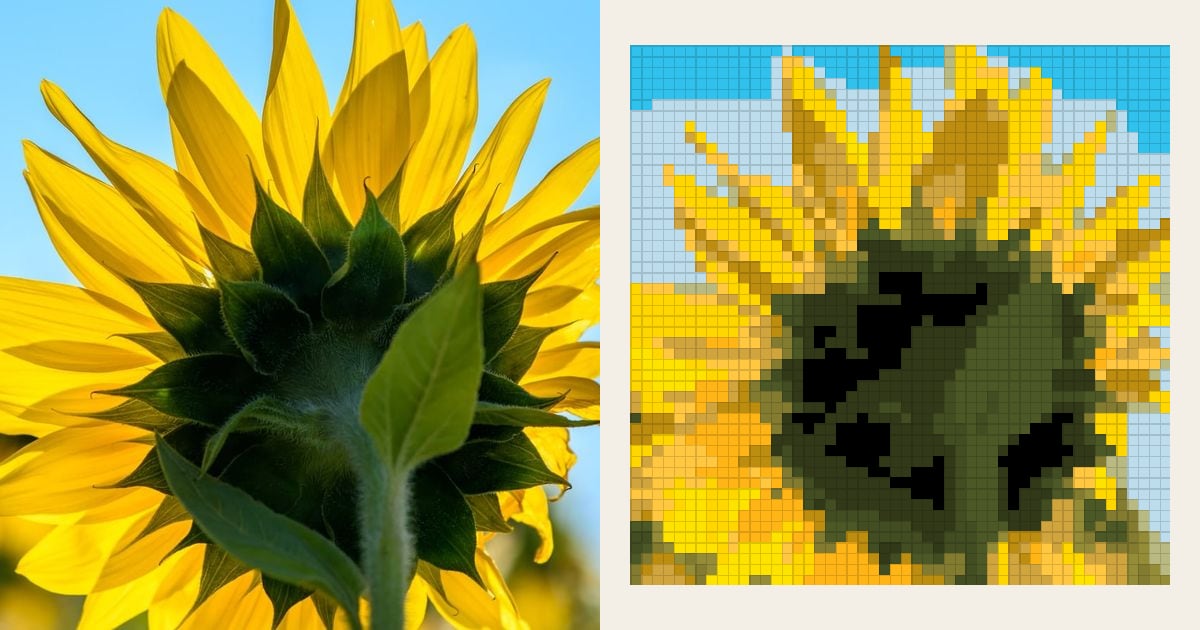
We tried both ways. We made a real 50 x 50 chart from a sunflower photo, and every number below comes from it.
What is a cross stitch pattern, really
It is a grid. Each square is one stitch, and each color or symbol points to one thread. That is all. Once you see that, the whole job of how to make a cross stitch pattern comes down to choosing the squares and the threads.
People have charted needlework for a very long time. The V&A says its collection includes "over 700 needlework samplers ranging from as early as the 1400s, to pieces stitched in the 20th century."
"Our collection includes over 700 needlework samplers ranging from as early as the 1400s, to pieces stitched in the 20th century."
Victoria and Albert Museum, Embroidery: a history of needlework samplers
Samplers were stitched examples to copy, and the word comes from the Latin exemplum, "an example." A chart does the same job on paper: it shows you the example, square by square.
A finished pattern has three parts. There is the grid itself, a key that lists each symbol with its thread, and the size. Our guide to reading a chart covers all three in detail.
Can I make a cross stitch pattern by hand?
Yes, and for the right design it is a nice way to work.
Here is the method. Grab graph paper, draw your shape, then color one square for each stitch. Pencils or markers work. Next, pick a thread for each color and write its number in a key at the side.
It works well for:
- Letters and names
- Hearts, stars and other simple shapes
- Borders and small motifs
It falls apart on photos. A photo has no clean edges, so every square needs a decision, and each decision is a color match by eye. The sums show why.
| Chart size | Squares to color | Size on 14-count Aida |
|---|---|---|
| 30 x 30 | 900 | 2.1 inches square |
| 50 x 50 | 2,500 | 3.6 inches square |
| 70 x 70 | 4,900 | 5.0 inches square |
Table 1. Squares to color at three sizes. Figures from the Threadhood converter, run on 3 November 2026.
A 50 x 50 chart means 2,500 decisions. A 70 x 70 chart means 4,900. That is why a hand chart is best kept for small, bold designs, and why a cross stitch pattern maker earns its keep on photos.
How do you make a cross stitch pattern from a picture?
This is the quick answer to how to make a cross stitch pattern from a photo. It takes six steps, and we followed each one with a sunflower photo.
Step 1: Choose a picture and crop it
Pick one clear subject with strong shapes. Then crop tight. Every square you save on background becomes detail on the flower. Our photo guide explains what to look for.
Step 2: Pick a width
The width is the number of stitches across. Height follows from your picture. We chose 50. The sunflower photo fitted a 50 x 50 grid, which is 2,500 cells.
Step 3: Pick the number of colors
We asked for 15. The converter used all 15, which gave 15 DMC threads. Fewer colors give a cleaner chart and fewer skeins. More colors suit soft gradients like skies.
Step 4: Let the converter build the chart
Open the Threadhood Studio and choose your photo. It runs on your own device, so the photo is not uploaded. A moment later you have a chart and a key. Each patch of the photo has been matched to the nearest real DMC thread, or Anchor if you pick that brand.
Step 5: Check the key
Never skip this one. Tap any thread that looks wrong, then choose "Swap for another thread". Or tap it and choose "Don't stitch it, leave bare fabric" for a plain background.
Step 6: Save or download
Download gives you the chart and key as an image. Save chart keeps it in your account.
What the sunflower chart looked like
Here is the real result, at the settings above.
| Measure | Result |
|---|---|
| Grid | 50 x 50 stitches |
| Stitches | 2,500 |
| Threads | 15 DMC |
| Design size, 14-count Aida | 3.6 x 3.6 inches |
| Fabric to cut, with 3 inch margins | 9.6 x 9.6 inches |
| Busiest thread | Lemon Dark (444), 343 stitches, 13.7% of the chart |
Table 2. The 50 x 50 sunflower chart. Figures from the Threadhood converter, run on 3 November 2026.
The top three threads were Lemon Dark (444) with 343 stitches, Blue Very Light (827) with 300, and Avocado Green Black (934) with 299. Those three cover 942 of the 2,500 stitches, which is simple addition.
Look at the other end of the key too. Olive Green (732) has only 33 stitches. That is a small amount of thread, but it still needs a skein, and it still means threading a needle in a new color.
One thread is worth a second look. Electric Blue Medium (996) is a bright, strong blue, and its nearest Anchor match is Ice Blue (433) with a difference of 8.9. At 5 or more, Threadhood calls a match approximate. So if you stitch with Anchor, expect that blue to look different from the chart.
We did not need to change any thread on this chart. We did check each one.
How big should a cross stitch pattern be?
It depends on the detail you need and the time you have. The same sunflower at three sizes tells the story.
At 30 x 30 the chart had 900 stitches and 15 threads. At 50 x 50 it had 2,500, and at 70 x 70 it had 4,900. The color count stayed at 15 each time, so each thread got more stitches and the shapes got clearer.
On 14-count Aida those sizes come out at 2.1, 3.6 and 5.0 inches square. The size changes with the fabric, because "count" means stitches per inch. DMC puts it this way:
"We recommend beginners use 14-count aida."
Whichever size you choose, the steps for how to make a cross stitch pattern stay the same. Only the stitch count changes. A good rule: choose the smallest size that still shows what matters. Flowers and simple shapes read well at 50. Faces want more stitches, up to the Threadhood maximum of 300 wide. Then check your cloth with the fabric calculator before you cut.
Which method to use
Both are fine. Pick by the job. A cross stitch chart maker wins on photos, and a pencil wins on a quick name or heart. If you only want to try it, start with a small chart and see how it feels.
| Your design | Best method |
|---|---|
| A name, heart or border | Graph paper |
| A small bold icon | Either |
| A photo of a pet, flower or place | Converter |
| A gift you need soon | Converter |
Table 3. Choosing between a hand chart and a converter.
One limit to know about. Threadhood charts use full crosses only. There is no backstitch, half stitch or quarter stitch yet. If you want fine outlines, add them by hand in pencil after you make the chart.
Now you know both ways. Ready to try it? Open the Threadhood Studio, choose a photo, and make your first chart free in a few minutes.
Frequently asked questions
How do you make a cross stitch pattern from a picture?
Crop the picture tight, then run it through a pattern maker. Choose a width in stitches and a number of colors, and the tool turns each patch of the picture into the nearest thread. Read the key, swap any odd thread, then download or save the chart.
How big should a cross stitch pattern be?
Small and bold designs work at 30 to 50 stitches wide. Our sunflower at 50 stitches wide is 3.6 inches square on 14-count Aida. Faces and fine detail need more stitches, and more stitches means more stitching time and more thread.
Can I make a cross stitch pattern by hand?
Yes. Draw a grid on graph paper, color one square per stitch, then match each color to a thread. It works well for letters, hearts and simple shapes. For a photo it gets slow, because every square has to be matched by eye.
Do I need to pay to make a cross stitch pattern?
No. Threadhood makes charts free in your browser, and free accounts can save 3 charts. A Studio plan adds unlimited saved charts, progress marking, a thread stash and the printable PDF kit.
Try it with your own photo
The pattern maker runs in your browser. No account, no upload, and you see the chart in seconds.
Open the cross-stitch pattern maker